Tables in HTML
In the last lesson, Images and Links in HTML, we learned to insert images and links into pages. In today's HTML tutorial, we'll show you how to make tables and lists in HTML. Both are sorts of containers into which other elements are inserted. We use them to organize these elements to achieve clarity and uniform appearance.
Tables
It often happens that we need a spreadsheet on the site. The table allows us to insert elements into its cells, which are then nicely ordered. Unlike paragraphs that always stack below each other, you can stack text in a table neatly side by side. In addition to text, cells can also contain images and other elements. This can be useful, for example, to display some results, parameters or statistics. For example, on phpweb, tables are used to list programs and tutorials
First table
Let's create a first, simple table. Create a new HTML file somewhere, fill in doctype, header, but you already know it. Let's create a table with 3 columns and 2 rows. We will omit the header and footer yet.
<table border="1">
        <tr>
                <td>Cell 1</td>
                <td>Cell 2</td>
                <td>Cell 3</td>
        </tr>
        <tr>
                <td>Cell 4</td>
                <td>Cell 5</td>
                <td>Cell 6</td>
        </tr>
</table>
The result will look like this:

We enclose the table between the paired <table> tag. We enclose each row in a paired <tr> tag (as a table row). Individual cells are then wrapped in a row with a <td> tag (as table data).
Table with header
Tables can be given a more complex structure, similar to the HTML page. It can contain a header in the <thead> tag and then a body in <tbody>. The table header is the first row that describes what the values in the columns mean.
You can also omit the header completely and then do not wrap the body in tbody. The thead can be similarly followed by the tfoot containing the table footer. We also write
The best way to understand everything in the next example, create a table with several laptops and their parameters.
We will now turn our simple table above into something more complex, pasting the code below:
<table border="1">
  <thead>
        <tr>
                <th>Preview</th>
                <th>Type</th>
                <th>Processor</th>
                <th>Graph. card</th>
                <th>In stock</th>
        </tr>
  </thead>
  <tbody>
        <tr>
                <td><img src="images/nb1.png" alt="Notebook"></td>
                <td>AB8AC9</td>
                <td>Intel Atom</td>
                <td>Nvidia</td>
                <td>No</td>
        </tr>
        <tr>
                <td><img src="images/nb2.png" alt="Notebook"></td>
                <td>GS8DGF</td>
                <td>AMD</td>
                <td>ATI</td>
                <td>Yes</td>
        </tr>
        <tr>
                <td><img src="images/nb3.png" alt="Notebook"></td>
                <td>KG1862A</td>
                <td>No info</td>
                <td>No info</td>
                <td>No</td>
        </tr>
  </tbody>
</table>
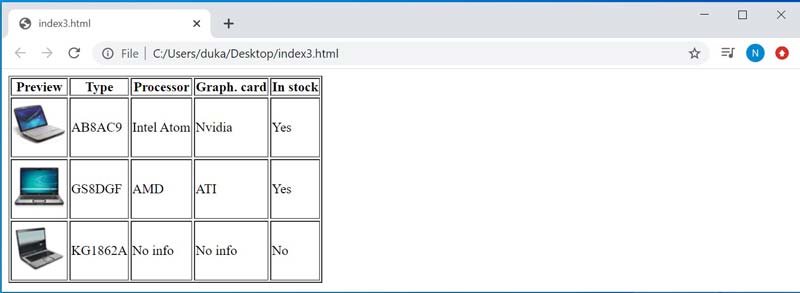
Result:

We see that the table has a header, the text in the header is bold and centered. Otherwise there is nothing new yet.
Merging of cells
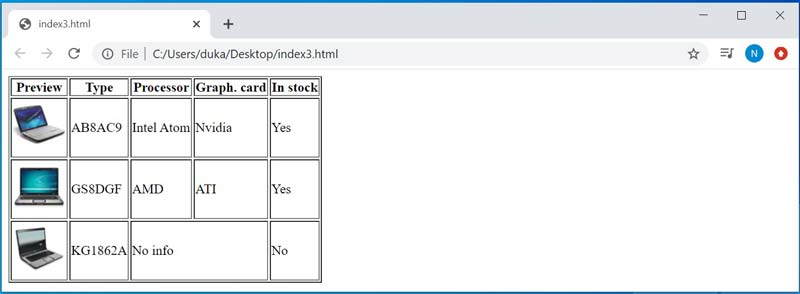
We can merge adjacent cells in the table. If we merge cells in a row, we write the cell only once and give it the colspan attribute. This value will have a number with how many cells it connects. In the table above, it is possible to link cells not listed in one. Therefore, the value of the colspan cell will be 2 (we connect 2 cells in a row) and delete the second cell. To edit the code for the last line, follow these steps:
<tr>
        <td><img src="images/nb3.png" alt="Notebook"></td>
        <td>KG1862A</td>
        <td colspan="2">No info</td>
        <td>No</td>
</tr>
And the result:

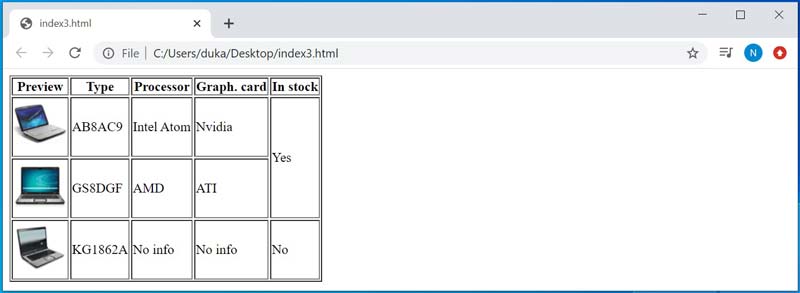
Similarly, you can join cells in a column using the rowspan attribute, which indicates how many rows are joined. Connect two more cells with the text "Yes". Delete one cell again, give the top rowspan attribute value 2. So the first 2 rows will look like this:
<tr>
        <td><img src="images/nb1.png" alt="Notebook"></td>
        <td>AB8AC9</td>
        <td>Intel Atom</td>
        <td>Nvidia</td>
        <td rowspan="2">Yes</td>
</tr>
<tr>
        <td><img src="images/nb2.png" alt="Notebook"></td>
        <td>GS8DGF</td>
        <td>AMD</td>
        <td>ATI</td>
</tr>
Result:

That is all the tables so far, the code of today's tutorial download again in the attachment below. We will show you how the text in tables is styled and aligned and how cells are resized later. Previously, special attributes were used, but these are now obsolete, so I don't want to list them here. The CSS stylesheet language is a new feature that will be introduced soon.
In the past, tables were used to create a so-called page layout (dividing a page into a title bar, logo, and content), and although this may seem beneficial for static pages, it is inappropriate for meaningful purposes. At first, I didn't want to confuse the reader with foreign words, but from now on I will use the word semantics. Web semantics deals with the meaning of individual elements. Therefore, using a table on a page layout is non-semantic because even if the site renders correctly, the table should contain some values and not the entire web content. Try to remember the difference between the <strong> and <b> tags. Both look the same, but highlighting the text with the <b> tag is non-semantic, since this tag gives absolutely no meaning to the text, just saying that bold fonts should be used to render. On the contrary, <strong> says: "This text is important". Semantics is what it means, not what it looks like. It is very important because semantic websites then have an advantage in search engines and often have higher traffic.
In the next lesson, HTML lists and tables, we'll review the lists and add navigation to our site.
Today's code : Download index.zip